
Registration and Login tutorial using JSP & servlet—(Part 1)
In today’s post, we will learn how to build a complete login and registration system using JSP & Servlet. In this post, we will design our Registration Page, and then we will code for the backend or server side. So no more intro, let’s start our work.
You can watch the video tutorial for this post on my YouTube Channel.
Prerequisite of the project
- NetBeans IDE.
- Apache Tomcat 8.5
- MySQL Workbench
- MySQL Connector Java 8.0
- Basic Knowledge of Java Class, and Servlet.
- Image for our project.
Step 1: Project Setup on NetBeans
This is the basic setup of our project. That will help us to better understand what we are doing.
- Open your NetBeans IDE and create a new project.
- Expand your project, right-click on the Web Pages folder and create a new folder name css and img folder.
- Again right-click on the Web Pages folder to create two JSP page names, index.jsp and register.jsp.
- If NetBeans doesn’t create a web.xml file, then right-click on the WEB-INF page>New>Other>web.xml to create a new web.xml file.
- Create a style.css file in the CSS folder as we created our web.xml file.
- Paste all of our required photos to the img folder.
- Now create a package for our Web Project. Right-click on the Sources Packages folder New> Java Package> package name and click finish.
- Right-click Libraries folder>Add JAR/Folder then select the mysql-connector-java-8.0.18.jar file
Step 2: Create a registration page
In this part, we will design our Registration form in the registration.jsp page, then copies the below code and paste it.
<%@page contentType="text/html" pageEncoding="UTF-8"%>
<!DOCTYPE html>
<html>
<head>
<meta http-equiv="Content-Type" content="text/html; charset=UTF-8">
<title>Register Account</title>
<link href="https://fonts.googleapis.com/css?family=ZCOOL+XiaoWei"
	rel="stylesheet">
<link href="css/style.css" rel="stylesheet" type="text/css" />
</head>
<body>
	<div class="container">
		<div class="regbox box">
			<img class="avatar" src="img/collaboration.png">
			<h1>Register Account</h1>
			<form action="RegisterServlet" method="post">
				<p>Username</p>
				<input type="text" placeholder="Username" name="name" required>
				<p>Useremail</p>
				<input type="text" placeholder="Useremail" name="email" required>
				<p>Password</p>
				<input type="password" placeholder="Password" name="password"
					required> <input type="submit" value="Register"> <a
					href="index.jsp">Already have Account?</a>
			</form>
		</div>
	</div>
</body>
</html>
Step 3: CSS style for the registration and login page
In this step, we will CSS code for our form. Open the style.css file from the css folder. Then copies the CSS Code from below and paste it into your style.css file.
body {
  background-image: url(../img/green-curry-background.jpg);
  background-size: cover;
  background-repeat: no-repeat;
  font-family: "Arimo", sans-serif;
  margin: 0;
  padding: 0;
  height: 100%;
  box-sizing: border-box;
}

.container {
  width: 80%;
  height: 100%;
  margin: 0 auto;
}

/***********************************************
       Account Registartiona and Login
***********************************************/
.box,
.regbox {
  width: 320px;
  height: 420px;
  background: #2f3542;
  margin: 0;
  padding: 30px;
  top: 55%;
  left: 50%;
  color: #fff;
  border-radius: 15px;
  position: absolute;
  transform: translate(-50%, -50%);
  box-sizing: border-box;
}

.avatar {
  margin: 0;
  padding: 0;
  width: 150px;
  height: 150px;
  top: -22%;
  position: absolute;
  left: calc(50% - 75px);
  border-radius: 50%;
}

.box h1 {
  margin: 0;
  padding: 30px;
  text-align: center;
  font-size: 30px;
}

.box p {
  margin: 0;
  padding: 0;
  font-weight: bold;
}

.box input {
  width: 100%;
  margin-bottom: 15px;
  border-radius: 5px;
}

.box input[type="text"],
.box input[type="password"] {
  border: none;
  background: transparent;
  border-bottom: 1px solid #fff;
  outline: none;
  height: 35px;
  color: #fff;
  font-size: 15px;
}

.box input[type="submit"] {
  display: block;
  border: none;
  outline: none;
  height: 35px;
  background: #eccc68;
  color: #000;
  font-size: 20px;
  border-radius: 20px;
}

.box input[type="submit"]:hover {
  border: none;
  outline: none;
  height: 35px;
  background: #ff6348;
  color: #fff;
  font-size: 20px;
  border-radius: 20px;
  cursor: pointer;
  transition: 0.3s ease-out;
}

.box a {
  text-decoration: none;
  color: #fff;
  font-size: 16px;
  line-height: 20px;
}

.box a:hover {
  color: #eccc68;
}

.regbox .avatar {
  margin: 0;
  padding: 0;
  width: 150px;
  height: 150px;
  top: -19%;
  position: absolute;
  left: calc(50% - 75px);
  border-radius: 50%;
}

.regbox h1 {
  margin-top: 30px;
  padding: 20px 0;
  text-align: center;
  font-size: 30px;
}

.regbox p {
  margin: 0;
  padding: 0;
  font-weight: bold;
}

.regbox input {
  width: 100%;
  margin-bottom: 15px;
  border-radius: 5px;
}

.regbox input[type="text"],
.regbox input[type="password"] {
  border: none;
  background: transparent;
  border-bottom: 1px solid #fff;
  outline: none;
  height: 35px;
  color: #fff;
  font-size: 15px;
}

.regbox input[type="submit"] {
  display: block;
  border: none;
  outline: none;
  height: 35px;
  background: #eccc68;
  color: #000;
  font-size: 20px;
  border-radius: 20px;
}

.regbox input[type="submit"]:hover {
  border: none;
  outline: none;
  height: 35px;
  background: #ff6348;
  color: #fff;
  font-size: 20px;
  border-radius: 20px;
  cursor: pointer;
  transition: 0.3s ease-out;
}

.regbox a {
  text-decoration: none;
  color: #fff;
  font-size: 16px;
  line-height: 20px;
}

.regbox a:hover {
  color: #eccc68;
}
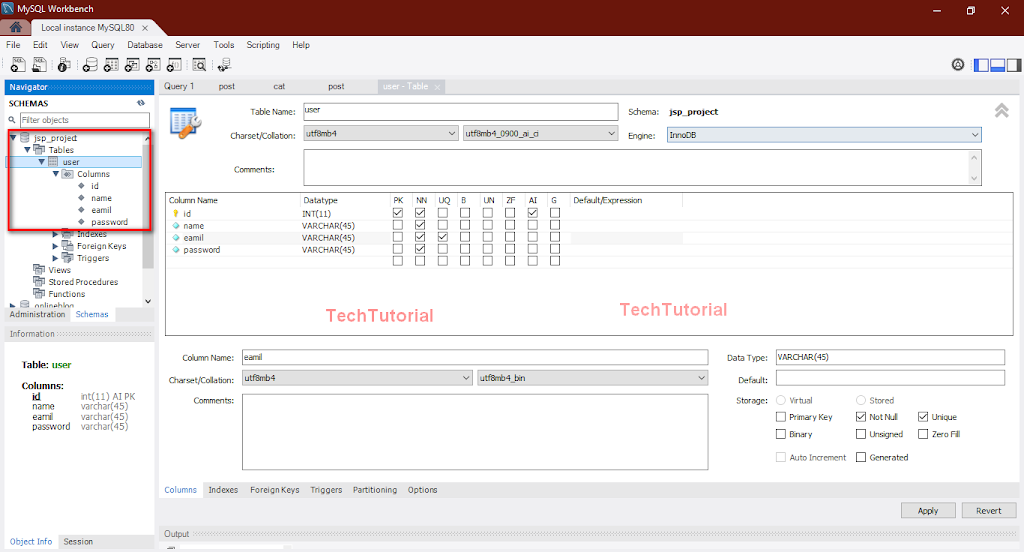
Step 4: Create MySQL database to store data
Now we will create a database to store our user data. So open your MySQL Workbench application and create a new database and give the name jsp_project .
— then create a user table with 4 columns which are (id primary key autoincrement, name, email unique, password)
Follow the picture
Step 5: Write server-side business logic
1. Create a User Model java class. Expand your Source Packages folder by right-clicking your package>new>java class> name it User. Now click finish. Then copies the below code and paste it into your User.java file.
*don’t forget to change your package name.
package newpackage;


public class User {
    int id;
    String name;
    String email;
    String password;

    public User() {
    }

    public User(int id, String name, String email, String password) {
        this.id = id;
        this.name = name;
        this.email = email;
        this.password = password;
    }

    public User(String name, String email, String password) {
        this.name = name;
        this.email = email;
        this.password = password;
    }

    public User(String email, String password) {
        this.email = email;
        this.password = password;
    }

    public int getId() {
        return id;
    }

    public void setId(int id) {
        this.id = id;
    }

    public String getName() {
        return name;
    }

    public void setName(String name) {
        this.name = name;
    }

    public String getEmail() {
        return email;
    }

    public void setEmail(String email) {
        this.email = email;
    }

    public String getPassword() {
        return password;
    }

    public void setPassword(String password) {
        this.password = password;
    }

}
2. Create a connection class that will be used to connect with our MySQL database.
*don’t forget to change this part (test”,”root”,”almamun@123″) with your database name, username, and password.
ConnectionPro.java
package newpackage;

import java.sql.*;


public class ConnectionPro {
    private static Connection con;

    public static Connection getConnection(){
        try{
            Class.forName("com.mysql.jdbc.Driver");
            con=DriverManager.getConnection("jdbc:mysql://localhost:3306/test","root","almamun@123");

        }catch(Exception e){
            e.printStackTrace();
        }
        return con;
    }
}
3. Now we will create a query class that will help us to handle the database. I mean insert data to the database, and find user data from the database. I name it UserDatabase.
*don’t forget to change your package name.
UserDatabase.java
package newpackage;

import java.sql.*;

public class UserDatabase {
    Connection con ;

    public UserDatabase(Connection con) {
        this.con = con;
    }

    //for register user
    public boolean saveUser(User user){
        boolean set = false;
        try{
            //Insert register data to database
            String query = "insert into user(name,email,password) values(?,?,?)";

           PreparedStatement pt = this.con.prepareStatement(query);
           pt.setString(1, user.getName());
           pt.setString(2, user.getEmail());
           pt.setString(3, user.getPassword());

           pt.executeUpdate();
           set = true;
        }catch(Exception e){
            e.printStackTrace();
        }
        return set;
    }
}
4. Create a servlet, name is RegisterServlet. We mention it in our register.jsp page form action.
On the servlet, creation time, don’t forget to deploy it in web.xml file. Copies the below code and paste it into the section.
String name = request.getParameter("name");
String email = request.getParameter("email");
String password = request.getParameter("password");
//make user object
User userModel = new User(name, email, password);

//create a database model
UserDatabase regUser = new UserDatabase(ConnectionPro.getConnection());
if (regUser.saveUser(userModel)) {
   response.sendRedirect("index.jsp");
} else {
    String errorMessage = "User Available";
    HttpSession regSession = request.getSession();
    regSession.setAttribute("RegError", errorMessage);
    response.sendRedirect("register.jsp");
}
I hope you follow the steps properly. And it’s working correctly. If you learned from here, please like the post, share the post and comment on the post if you have any questions.

share image folder bro .. tamit700@gmail.com
hi, thanks for your comment. you can check this github link https://github.com/Almamun-Hossain/login-and-registraion-using-jsp-servlet-and-mysql to get full project. thanks
hi thanks for this tutorial and really i need more tutorial like this one i will be thankfull if you do somemore after that i have a question my question is
Can you show me how you add the RegisterServlet to your web.xml
Best regards from Djibouti
hi, thanks for your comment i will continue my passion to help you guys just sharing my knowledge.
Excellent work sir! Waiting for upcoming videos.
please share project image folders or share link.
sure dear. thanks for your comment.
can i do this in eclipse IDE? will it work
sure it will work in eclipse ide
i followed all the steps.but i got error
The requested resource is not available.
http 404 not found
glassfish 4.1
sorry to hear that. please check the your console for more details about the error.
I would like appreciate every stakeholder of techno voice.
i followed all the steps.but i got error
The requested resource is not available.
http 404 not found
glassfish 4.1.1
i think the problem is in your url routing
Hello my friend, i hava got a question: Can we do the same thing in Intellij Idea?
yes but in Intelij Idea community editin there is no support for jsp.
i have a problem : Erreur à l'instantiation de la classe servlet [newpackage.RegisterServlet]
i am not able to store details in database after register it is not going to index.jsp page can anyone help out
Could you please check your servlet(url) and then dao query.
sir the error message wont show up if the user is available…
can i ask some questions
Yes, Please ask.
sir data is not storing in database
it showing like this
HTTP Status 404 – Not Found
Type Status Report
Message JSP file [/register.jsp] not found
Description The origin server did not find a current representation for the target resource or is not willing to disclose that one exists.
Apache Tomcat/9.0.50
Bro i downloaded your project from github and and i abviously included the jdbc connector and tomcat server but when i try to register it wont do it and remain on the registration page i have checked all you code and i didiìnt find any problem. i also changed the database name and password
but still not working.
i also tried to manually add add a user and then log in but still nothing.
Sorry to hear that Asib. Could you please check your console what's the error its showing you?
Bro How to install workbench and use it for this project